Thursday 29 September 2016

Battle Report - Flames of War - Halfaya Pass

Time for another Wednesday wargaming battle report.

Still playing some early war desert games, this time I decided to set up a bit of a halfaya pass table and try out the breakthrough mission. I had a tank company so was the attacker this time.

I went for:

Panzer 3 Commander
4x Panzer 3
4x Panzer 2
2 Units of Armored Cars
4x HMG
2x Pak 36

Having guns in a tank list maybe seems like an odd choice but it was a couple of cheap platoons, and also I feel like having infantry is allot more viable in early war so having things to shoot at them is allot more important. Also Panzer 3s are crazy expensive and 2s are kind of crap.

The british had a guards rifle company, similar to last game but only 2 Matildas and a bit of stuff moved around I think the artillery added in.

Since I had tanks I was attacking so it was my job to get up the pass. This is another one of the missions I really like as it forces both sides to move around and make choices, and you can't just sit in one spot and wait until you win. So it's more interesting to me at least.


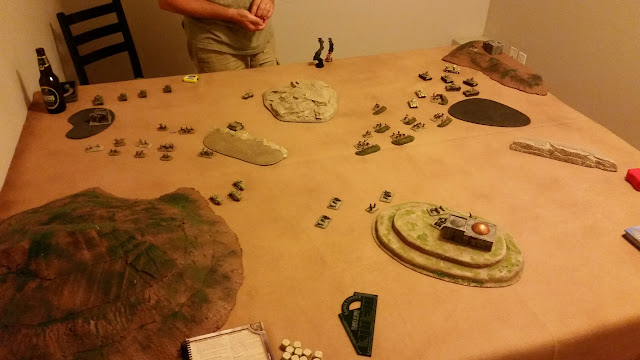
Here we are set up before recon moves. Have a big giant hill which almost fills a quater of the table with other hills and tombs. We are imagining that it slopes up from the bottom right to the top left. I figure the pass is not as hard and flat as the upper plains so we are not treating the sand as road this time just regular ground.

My plan here is for the Panzer 3s to stay as far from the Matildas as possible at all times and hopefully kill the artillery guns before we all die. The recon can harass, the HMGs want to pin the British infantry in place and amke it hard for them to go be on the objective and the anti-tank guns are now anti-artillery guns. I have the Panzer 2s in ambush as the breakthrough, and the brits have portee guns and carriers in reserve due to the mobile reserves special rule.


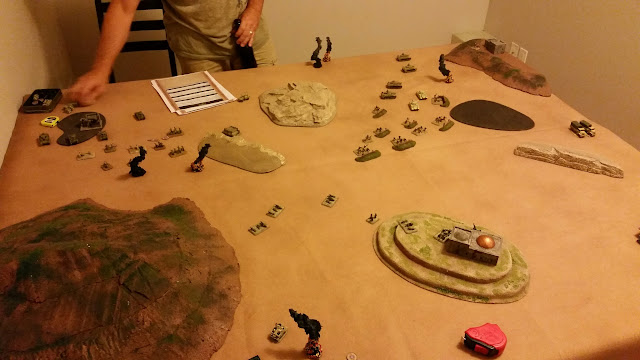
Turn 1 went very well for me, everything that could fired at the artillery and got me a kill, the infantry fired at the brit infantry which I used the recon to pull gone to ground from and got a kill.


The British came back with 2 guns shooting at my tanks but no hits due to range, and one at my cars but they disengaged. All the infantry and guns on the left made a run for the objectives, and the Matildas launched an assault on my guns position to try and foil my plan. But they got no kills and just pushed me back.


Turn 2 I kept my tanks moving away and hitting the guns, which got me another kill. My HMGs moved up on the hill to catch the running infantry and killed all the teams that were in range. The Matildas assauled a second time and got a kill a gun before I could break off. The artillery went for my armored cars who had been doubling all around them to try and cut them off. They got all but 1 but I passed platoon morale.


Turn 3 my tanks came in, very prompt! I kept circling my Panzer 3s around the artillery and killed the last two. My HMGs and extra stuff started surrounding the infantry heading for my objective. The brits took a risk and doubled the Matilda platoon, since I basically can't hurt them. The portee guns also game on and had a couple of shots but just got a bail.


Turn 4 the battle continues. I tighten the net a bit on the gone to ground infantry wearing them down bit by bit. My tanks moved and took a couple of side shots on the one Matilda. Was a chance for a double bail but I just got the bail. The rest shot up the annoying gun truck but one managed to survive.


The Matildas fired back of course but between them and the guns only got one kill. I was expecting it to be much worse, but when you think of the odds that is about right. At this point the Panzer 3s gave up going to the objective they just want to delay the Matildas now and keep them distracted. A carrier platoon also showed up and tried to kill my gun, but couldn't get past the gun shield and my sweet luck.


Turn 5 time to get an objective locked down. I played the same game with the Matilda again, no bail this time but I got the last truck. My one anti-gun fired on the carriers and got a kill and a bail. My Panzer 2s moved into position to block the british infantry from being able to contest. It turned out that they had stopped with the closest team just outside of range. I was thinking of assaulting with the tanks but was to scared, so instead sent in some armored cars. Even that was looking grim but we remember that the HMGs can't shoot backwards so they got in easy and took out a few teams. I failed my platoon morale and the british infantry passed theirs, but they were left pinned down.


The brits retailated as best they good, downing another panzer 3, and shooting up a couple of HMG teams. But their infantry was stuck pinned. A HMG tried to move for a lucky pin but no dice. Finally the commanders tried a desperate assault but failed a tank terror test. So I was left with the objective when it became live in turn 6.

So I actually won one for once! Nice. The Panzer 3s really proved their worth in this game I think just by surviving. I think it is worth choosing them over 4s having 3 armor all around makes life a bit easier. The 4s have a bit better gun but only 2 side armor. I only found that the gun teams worked out quite well, but allot of that maybe has to do with the mission.

I am really enjoying the desert games, and especially the mobile battles. The campaign starts on Sunday so hopefully that will be alright as well.


Thanks;
Mike

Tuesday 27 September 2016

Painting - Infinity, Flames of War, and Kensei

Hello Folks,

Time for another painting update. Got a few things finished off.

Firstly I got through the Yu Jing starter that I was working on from the new Operation Red Veil set.

Ninja, Tactical Bow:


Here is the sneaky Ninja with tactical bow.

Zu Yong, Heavy Infantry:


Next is the Zu Yong who is just a normal heavy infantry guy. I kind of like this one the best for some reason.

Hellcat, Hacker:


Next up is the Hellcat drop trooper, who can combat jump in and hack computer or shoot everyone.

Hsien, HMG:


And lasty is the Hsien with HMG who has a multi-spectral visor to discover the invisible people and a big gun to make them dead.

Full Group:


Here is a shot of the full group together, ready to start some trouble. I like how they turned out, a bit simple with mostly just black and yellow but I think it works. I tried a game with these guys last Friday and found it to be fun, always good to try out a new army. I ordered some new stuff to reinforce up to a more full army, basically another ninja and some crazy samurai type guys so will have them whenever they get in. could be awhile.

Afrika Krops:


I also did a very small amount of stuff to flesh out my Afrika Korps for our upcoming early war desert campaign (starts Sunday). In the new book the infantry platoons all have a light mortar team, which is different from how it was in the last campaign so I needed to get a couple of those and likewise a second anti-tank rifle team. You used to be able to get only one of them but now it is one per platoon. I am also planning to do a pair of medium mortars so I will be able to field the full 6, and also picked up a new Stuka. My other ones are all broken and painted badly with no decals so I decided to replace. Turns out you can buy single light mortar teams for $2.50 so no reason not to get them!

Sohei Clan Hero:


Lastly for this week I have finished off another Kensei miniature. This is a hero for the warrior monks which I thought had a neat pose. Working on some Skeleton Samurai now.


Pledge Status 2016:
Bought: 277 (+4 Flames of War)
Painted: 331
Total: +54

Thanks;
Mike

Thursday 22 September 2016

Battle Report - Flames of War - Early War - Dust Up

Time for another Wednesday wargaming battle report! Playing some more early war desert flames of war games, this time the mission is Dust Up which is one of the ones I quite like.

I decided to change things up a bit for my list, but still using the Shutzen company, so this time I had:

Command
Full Platoon
Short Platoon
HMG Platoon
Mortar Platoon
Infantry Gun Platoon
3x Panzer 2
3x Panzer 3
2x 231 armored car

The British switched over to a guards Rifle company, with machine guns, carriers, 2 platoons, Portee Guns and matildas.


Here we are after deployment and Recon moves. I have started with one infantry platoon on the lower objective, and HMGs and the Infantry Guns by the upper one, with the guns behind the hill. The armored cars have moved over, their job is to slip by the matildas and go for the undefneded back British objective. The Brits started with one infantry, HMGs and matildas.


I moved my armored cars up to hide behind the Oasis, the Matildas got a few long range shots but no effect as it was not easy to hit even for the guy in the open. The British machine guns moved up at the double.


On my next turn I moved up my cars so they were just outside of range of where the matildas could get, and walked one HMGs up onto the hill to shoot the Brits doubleing in the open. My theory was that he would die but would kill a few teams so that seemed like a good trade. In the end I killed 2 guns and lots one so not bad. The Matildas continued to trundle forward.


Next turn I decided to risk it a bit and doubled my cards towards the back objective. The matildas didn't go for it but the HMGs did try for some shots as you can see being measured. But the bullets didn't quite get through my armor. I kept trying to get a Matilda kill with my artillery but was still not able to even get a hit.


On turn 3 no one got any reserves, but my recon was able to move right on to the objective, forcing the British infantry to move towards them in the open. Meanwhile the matildas got right in my face and started to plan their assault, and killed one gun with machine guns, I moved so infantry up to be in the zone.


On to turn 4, no reserves again which gave the Brits an opportunity to go to ground. My recon kept up the fire but there is just 2 of them. On the other side the Matildas launched their assault. My gun got lucky with the defensive fire and managed a kill, despite being pinned with 1 shot and Matildas being almost invulnerable! I lost a few teams but they were pushed back, so not overly concerned. But time is beginning to be a problem!


Turn 5 reserves began to arrive, and I got all of my tanks in! They moved up to blast the infantry. Sadly I forgot to remove gone to ground with my recon which would have doubled the amount of hits I was likely to get. So they were left 1 team away from making a morale test. But still the noose was closing in. I don't think the Brits got any reserves, but the Matidlas continued to grind away, there is just 2 of them but I don't have much of a chance of getting kills with only one gun that even has a chance! Really it is about who can secure things first.


Next go around I get in my other infantry platoon, and should also have gotten my mortars but I forgot they existed! My focus was to much on bringing in more infantry to trade for time with the Matildas. The Brits go some portee guns in and raced for their objectives. All my tanks closed in on the infantry, and again I forgot to recon. But after 3 assaults all they had left was the commanders and 2 teams. This cost me an armored car and a tank and frustratingly not getting the objective secured.


Next turn the Brits got in some infantry and carriers, and shot my gun in the back! The press for the objectives continued on by sides. I moved my infantry up to contest and shot at the HMGs on the hill and got ride of those pesky guys. My tanks finished off the infantry, except for one pesky commander. So things are very close but still no one is able to get a win.


Next go around I moved up my HMGs to try and get a lucky go at the carriers. The shooting for me 2 bails, but didn't get the kill in assault to seal the deal so they escaped. My commander moved up and then storm troopered to be just in range to contest, and my tanks fired on the pesky trucks who had taken over the duty of blocking my win. At this point I realized that I only had 3 platoons left on the board out of 8 so rolled a company morale which I failed and lost me the game. Later on I realized that I had forgotten to deploy my mortar platoon! So I wouldn't have had to make that test at all but ah well lost the game due to forgetting things. Well there is a chance it could go either way, but I think I was running out of stuff to contest faster, and my HMGs are dead meat so that is a test next turn even without the mortars.

Still it was a crazy close game and could have gone either way, I think a few mistakes with the recon cost me big. Matildas sure are hard to deal with, but they are expensive and slow so hard to know if they are worth it or not. Obviously it would be good for me to take the 88, but having that immobile gun with huge range is the opposite of what I like about the desert. I want to have interesting battle with maneuver not huge immobile guns so I am resisting that.

Hopefully you enjoyed this crazy close battle, even thou the wrong side won out in the end!


Thanks;
Mike

Tuesday 20 September 2016

Painting - Infinity, Kensei, and Kingdom Death

Hello All,

Time for another painting update I guess. Been a but busy for the last little while so have slowed down a little bit. But still got some cool stuff done. I have really allot of projects that I want to work on right now, so I have been doing little bits of a bunch of things basically. No commitment at all. I split the new starter set for Infinity last week so that has come to be the biggest priority I guess, since that game gets played allot by me, but only 7 models so not a huge thing. I got the Yu Jing half which is the Chinese faction basically.

Zanhshi (Infinity):


These are the basic infantry guys from the new set. The one on the left looks slightly clownish but they are pretty cool I think. I decided to go with some cobblestone bases, mainly just because I had them and it was easy.

Spy and Kensei (Kensei):


I also got a couple of Samurai type guys. I was in their kickstarter for the Samurai undead so these are a couple of things I got to go along with that. Have been eyeing their models for awhile. The one on the left is the spy. Basically I am planning to do a few models  here and there, looking to play some fantasy games eventually. Probably will use the Lord of the Rings skirmish game as I like that. They also included a discount code so I might get a bit of terrain and some ninja's when they go up.

King's Hand (Kingdom Death):


Finally I got another one of the monster done for Kingdom Death, only 2 more left in the base set now I think. Got to play this game a fair bit while my brother was visiting, and it is pretty cool. Lots of fun to be had with all the random bad stuff that happens.

As a bonus here is a couple of shots I took from the Historical club Saga day on Friday, and then the Infinity tournament Saturday at Fandom. I was not great a taking pictures either day, but eh what are you going to do right.


Teutonic Knights taking ground from Vikings

Morats getting ready to fight some Bakunin forces
Remains of Morats after fighting Assassins

The models tend to get lost in the fancy infinity scenery in pictures like this, but there are a few of them around! I guess also it is a big table with lots of terrain and only like 18 guys to start with all taking cover, so ya don't always feel like you are capturing the action.

Pledge Status 2016:
Bought: 273 (+7 Infinity Set
Painted: 322
Total: +49

Thanks;
Mike


Thursday 15 September 2016

Battle Report - Flames of War - Early Desert

Well time for another battle report. Flames of War again, this time we decided to try out some Early War desert games to practice and experiment a bit with lists for the upcoming campaign. Also the early war in the desert can be fun so I thought it would be a cool change of pace.

I went with a Schutzen Kompanie (Motor Rifle) and had:

Command
2x Platoons of 6 MG teams with light mortar and Anti-tank rifle
Platoon of Mortars
Platoon of 4 Panzer 3H
2x Platoons of 222 Armored Cars with 221 Radio commander

The evil British had (Jock Column):
Command
Brigadier Jock
2x Motor Rifle Platoons
2x 18/25lbr Platoons
Platoon of 3 Crusaders
Platoon of 3 MG Carriers

We rolled a mission and got Free for All which is not one of the more fun ones, but anything other then a defensive battle is fine by me. The British was nominally the attacker and won the roll to go first.


Here we are all set up. I deployed one platoon of infantry mounted in their trucks so I can make a push for the objective. This is usually not a good way to win in Free for All as you often just bleed platoons and break on company morale. But it is boring if everyone just sits and ignores the objectives. Better to loose a fun game and go down trying. My plan is to attack the objective in the depression, I figure if I can kill just the 2 guns I can take it. But that is not easy. My idea is to chip away with MG shots and try for a lucky kill while storm troopering back from the edge, and win the tank battle fast and bring them in also. Plus I have some armored cars there. Of course there are artillery guns all along the back edge so that is a problem.


To get things started the carrier platoon starts to fight with my armored cars behind the hill, and the crusaders annoyingly double time over that way. Not much effect, but my cars shoot back and get a bail. Can be hard to kill with 5+ fire power. On the other side my stuff moves up to get into position.


Next turn the tank battle starts. The crusaders move into cover of the mosque and fire but get no kills, the range is a bit far for their liking. I move to get some side shots with my armored cars and get a bail, but my tanks have to move, so also just get a bail. Not the decisive battle I wanted. The brits bombarded my infantry and cars and killed one armored car. I moved up to the edge for some shots but got no kills. My infantry came back to safety but the armored cars got stuck in the open.


The Crusaders fall back to get ride of my flanking armored cars with the help of the carriers this is easily done. Which forces my tanks to move and I just get some bails again. The brit artillery on the right flank shoots my cars of open sights making short work of them, they are very strong especially with Jock there to re-roll misses under 16". The other artillery bombs and kills an infantry or something like that. I have been moving my mortars over at the double to get in on the shooting at guns.


Next turn the crusaders finally come in to play, killing one of my tanks. Which finally allows me to return at full rate of fire and I get rid of all but one.Sadly my infantry platoon decides this is not happening and heads back to Germany.


The brits increase the pressure on my tanks, creeping some guns up to direct fire, and bringing in the carriers. They are also moving on my commander and mortars. This is not looking great! But my tanks are finally able to kill the last Crusader before they die so something was achieved.


I made a last ditch effort against the motor platoon that crested the hill. Firing my mortars directly and moving their commander and the CIC up to SMG and then assault. I ended up one team off from a platoon morale check thou. So next turn all of that stuff was easily killed. Leaving me to roll a company morale with no CIC. I forgot that the 2IC can still roll in the new version now that I think of it. But there is nothing to stop the carriers from taking the objective so that hardly matters. With 1 platoon lost it was a 5-2 victory for the Brits.

I really like the desert, but Free for All is a tough nut to crack against all that artillery which is very strong shooting directly and hard to kill, seeing as they are fearless vets with turn tables and gun shields, and not allot of things have high fire power in this period. Even my tanks can hardly save against them!

I have a few ideas for list changes to help put a hurt on them thou, maybe the Heavy Infantry Gun platoon which I do find good can get a kill or 2. Really the best option is a stuka I think, they are cheap in early war even for priority, but due to limitations in the campaign they can't always help.

Another option is a full company of Panzer 3s which I will try eventually. But at 610 points for 4 I don't fancy my chances against the Royal Horse Artillery!

Thanks;
Mike

Thursday 8 September 2016

Battle Report - Flames of War Axis of Attack - Kursk

Hello Folks,

For this weeks wargaming on Wednesday we thought it would be interesting to try out an Axis of Attack campaign. The idea is that there is a string of battles to be fought and you push back and forth like a tug of war. We picked up the campaign for Kursk from the Flames of War website and went to give that a shot. We went for Axis One so our first battle would be at Cherkasskoye. This would have the Germans launching a massive attack on the Soviet's first defensive line. for the campaign this is a Hold the Line missions with the soviets defending with a Strelekovy Company (1500) and the Germans attacking with (2000) points and are allowed to have air.

I considered a few options based on what I have and decided to go with a Tiger company. Other options were Panthers and Infantry. So I had a command Tiger, 2 Platoons of 1 Tiger each, 3x Panzer 3s, an Infantry platoon, some Pznaerwerfers, and a Stuka with bombs.

The Soviets had 2 companies of infantry, one with 2 platoons (20 Teams) and one with 1 platoon (9 teams I think) the big platoon had an attachment of 5 pioneers, and they had to big platoons of the biggest anti-tank guns points can buy in ambush. 4 other platoons were in reserve but they were picked to be as small as possible to take advantage of the reserve mechanic so were not important.

It has been a long time since we played Flames of War, so there were some mistakes especially in the start, but got more into as things went on.


So here is the start position. Pznaerwerefers and Panzer 3s hiding behind the hill, Tigeres spread out, and infantry lined up. The Soviet army has a huge blob of infantry dug in all across the board close to the edge of their zone, the guns in ambush. One objective is at the rail crossing, and the other is on the far right of the picture by the shell holes. All the guns in ambush of course.

My thought is that I need to stay outside of 16" with my tanks until the guns arrive and the destroy them at long range and assault. Also hoping that the plane and rockets will get some good kills in on the infantry. I got pretty good with tiger skills and had 2 top aces with 2 skills and they all had re-roll hits or ROF3 if not both.


Turn 1 I creep forward and lay down fire, moving the infantry to get them in the edge of MG range. The Panger 3s take cover behind the hill where they can temp a gun platoon to that side but are hard to hit. For the frist while I was averaging 1 kill per turn, with 25 stands to kill to get the objective! The soviets just sat and passed the turn back.


Turn 2 was just more of the same. I started to edge forward with some of the Tigers so I will be good to get on the Soviet half by turn 6 to avoid losing from that win condition. As before killed 1 team, last time it was the stuka, this time my infantry got one. The soviets finally deployed the ambushes, but got no kills just a bail. I think this was on turn 3 or 4 but I am not certain. I think Serge was mainly waiting out the air support dice.


My retaliation was to shoot everything at the guns! I was able to kill 2 of the big AA guns so that was not bad. At this point we remember you can't shoot over moving infantry so I left a tiger gap. My stuka arrived but the 2 remaining AA guns decided to have perfect accuracy and shoot it down. On the Soviet turn the AA libered and towed off the hill since they would not be shooting, now I can't really shoot them.


Next turn I kept up the fire, limited effectiveness, and brought around the Panzer 3s to hide from guns and get ready to assault. The next picture is blurry but the Soviets towed the gunts in position to overwatch the objective, well only one of the AA guns could fire, but still. I started chipping away teams with Tiger assaults.


Next turn things started to get risky as that gun was in position and set up. I failed to hit it with the rockets so no pin, and my infantry was pinned by artillery so couldn't move in yet. We were running low on time so I decided to keep assaulting instead of methodically destroying the guns. One Tiger was bailed by the defensive fire, and then I lost it in the second round when I was forced to break off. The big platoon is getting close to platoon morale now with like 12 teams dead, but they are fearless with a CO and Komissar so a tiny chance to break anyway. The soviets brought up the pioneers to be in range for the next assault, and that was about it really, some shots but no damage really.


Due to time I had to keep on with assaulting, not time to wait a couple of turns MGing those not dug in pioneers, so things are getting worse for me. I got a couple of more kills, and lost some Panzer 3s. The Soviets moved up some of the smaller guns to the edge of the wood so they would be in the 8" bubble for defensive fire when I assaulted next time.


This was pretty much going to be the final turn. I decided to fire a smoke bombardment instead of trying to pin, which I think was a mistake. Anyway I set in the infantry first and they got pinned by defensive fire, but lots only 1 team despite 10 hits. Then the alive tanks went in, the CO got killed and the last tiger held for a few turns but broke off. I had forgotten to roll for bogging every turn with the woods, but he failed the one test I rolled and was captured. The Russian infantry passed their platoon morales, so it was a failure for me despite a 500 points advantage.


According to the campaign I would now have to attack again but without the 500 bonus points, and same time constraints. So I decided eh forget that the East Front sucks. So I am putting in for a transfer to the Afrika Krops! Those guy know whats going on. So the whole campaign is a Soviet victory, next week early war desert time!!

Thanks;
Mike